Note: It may be helpful to print out these instructions before you start the swap cartridge procedure.
| Figure | Step |
|---|---|
Figure 1: Home screen
|
Step 1 to : Enter Diagnostics Mode to disable the cartridge check function. Go to the home screen on the touchscreen, then locate the scroll bar on right as shown in Figure 1. |
Figure 2: Touch Administration
|
2. Touch the down arrow on the scroll bar to find ADMINISTRATION. Then touch ADMINISTRATION. |
Figure 3: Scroll bars
|
3. There are now two scroll bars as shown in Figure 3. |
Figure 4: Touch Troubleshooting
|
4. Touch the down arrow on the left scroll bar to find TROUBLESHOOTING. Then touch TROUBLESHOOTING. |
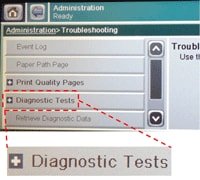
Figure 5: Touch Diagnostics Tests
|
5. Touch the down arrow on the left scroll bar to find DIAGNOSTICS TESTS. Then touch DIAGNOSTICS TESTS. |
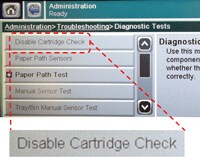
Figure 6: Touch Disable Cartridge Check
|
6. Touch DISABLE CARTRIDGE CHECK on the touchscreen. The message PLEASE WAIT. CHECKING PRINTER displays on the control panel until the printer finishes checking. The printer then returns to the READY mode. |
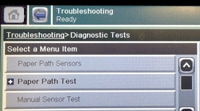
Figure 7: Diagnostics Tests Window
|
7. The Diagnostics Tests Window is as shown in Figure 7. CAUTION: The tab DISABLE CARTRIDGE CHECK has disappeared on the touchscreen. |
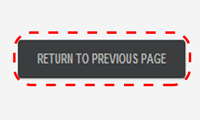
Figure 8: Click the RETURN TO PREVIOUS PAGE button on the webpage
|
8. You have finished setting up the printer diagnostic mode. Please click the RETURN TO PREVIOUS PAGE button at the bottom of this webpage, and go back to the main instruction of swapping procedure. |